How-To Guides
How to Mount Solar Panels on an RV Roof (2026 Guide)
Step-by-step mounting guide · Roof types, brackets, sealants, wiring · October 2026
Mounting solar panels on an RV roof is a weekend project for most owners, but the details decide whether your array lasts a decade or leaks in a year. The right mounting method depends on your roof material, your panel type, and how much wind and highway vibration the install has to survive. This guide walks through every decision in order: identifying your roof, choosing brackets or adhesive, sealing penetrations that stay watertight, routing cables inside, and avoiding the mistakes that cause most RV solar failures. Already picked your panels? See our 600W RV solar panels guide for kit options.
Affiliate disclosure: RV Solar Power Guide is reader-supported. When you buy through links on this page, we may earn a commission at no extra cost to you. Our picks come from comparing verified specs and price. We don't accept payment for placement.
Best method for rigid panels
Z-brackets screwed into roof joists or decking, every penetration sealed with Dicor self-leveling sealant.
Best method for flexible panels
Silicone adhesive per the panel manual, or 3M VHB tape / Sikaflex 252 as widely-used community methods. Check your panel's approved mounting list.
Drill vs no-drill
Drilling with proper sealant is the proven long-term method for rigid panels. No-drill adhesive suits flexible panels or temporary setups.
Key mistake to avoid
Using silicone sealant on a rubber roof, or skipping the drip loop where cables enter. Both cause leaks that show up months later.
How to mount solar panels on an RV
Know your RV roof type first
Everything about your mounting plan starts with the roof membrane. Most RVs built in the last 20 years have one of three roof types, and each one changes which fasteners and sealants you should use.
EPDM rubber is a black synthetic rubber membrane, the most common RV roof material. It accepts screws well and seals reliably with Dicor self-leveling sealant. The one rule: avoid petroleum-based sealants and cleaners on EPDM, because petroleum products can swell and degrade the membrane over time.
TPO is a white thermoplastic membrane, increasingly common on newer rigs. It behaves much like EPDM for mounting purposes and also pairs with Dicor. TPO reflects more heat than black EPDM, which is a small bonus for panel efficiency.
Fiberglass roofs are rigid, smooth, and strong. They take screws cleanly and bond excellently with polyurethane adhesives such as Sikaflex 221 or 252. Because fiberglass is rigid, you can often hit solid structure with shorter screws, and adhesive-only mounting holds better here than on flexible membranes.
Aluminum roofs appear on older RVs and some truck campers. They are thin and oil-can (flex) under load, so use larger backing plates or washers to spread the clamping force, and seal with polyurethane rather than relying on the metal to stay flat. Check for existing corrosion around any penetration before you reuse a hole.
If you are unsure what you have, appearance can help but is not definitive: check your RV owner's manual, manufacturer specs, or ask a qualified RV technician. As a rough guide: EPDM often shows a chalky white residue when you rub it (it is white over black rubber); TPO is smooth, shiny, and does not chalk; hard glossy shell is fiberglass; rivets and seams indicate aluminum. EPDM and TPO look similar when new, so use the chalk test or check your paperwork. Dicor self-leveling sealant is documented as compatible with EPDM, TPO, fiberglass, and aluminum, but remember it is a sealant, not a structural adhesive, and the self-leveling formula is for horizontal surfaces only.
Mounting methods for rigid panels
Rigid glass panels are heavy (a 100W panel weighs 13 to 15 pounds, a 200W panel 25 to 30) and they catch wind. Mechanical fastening into the roof structure is the standard for a reason: it is the only method proven over hundreds of thousands of highway miles.
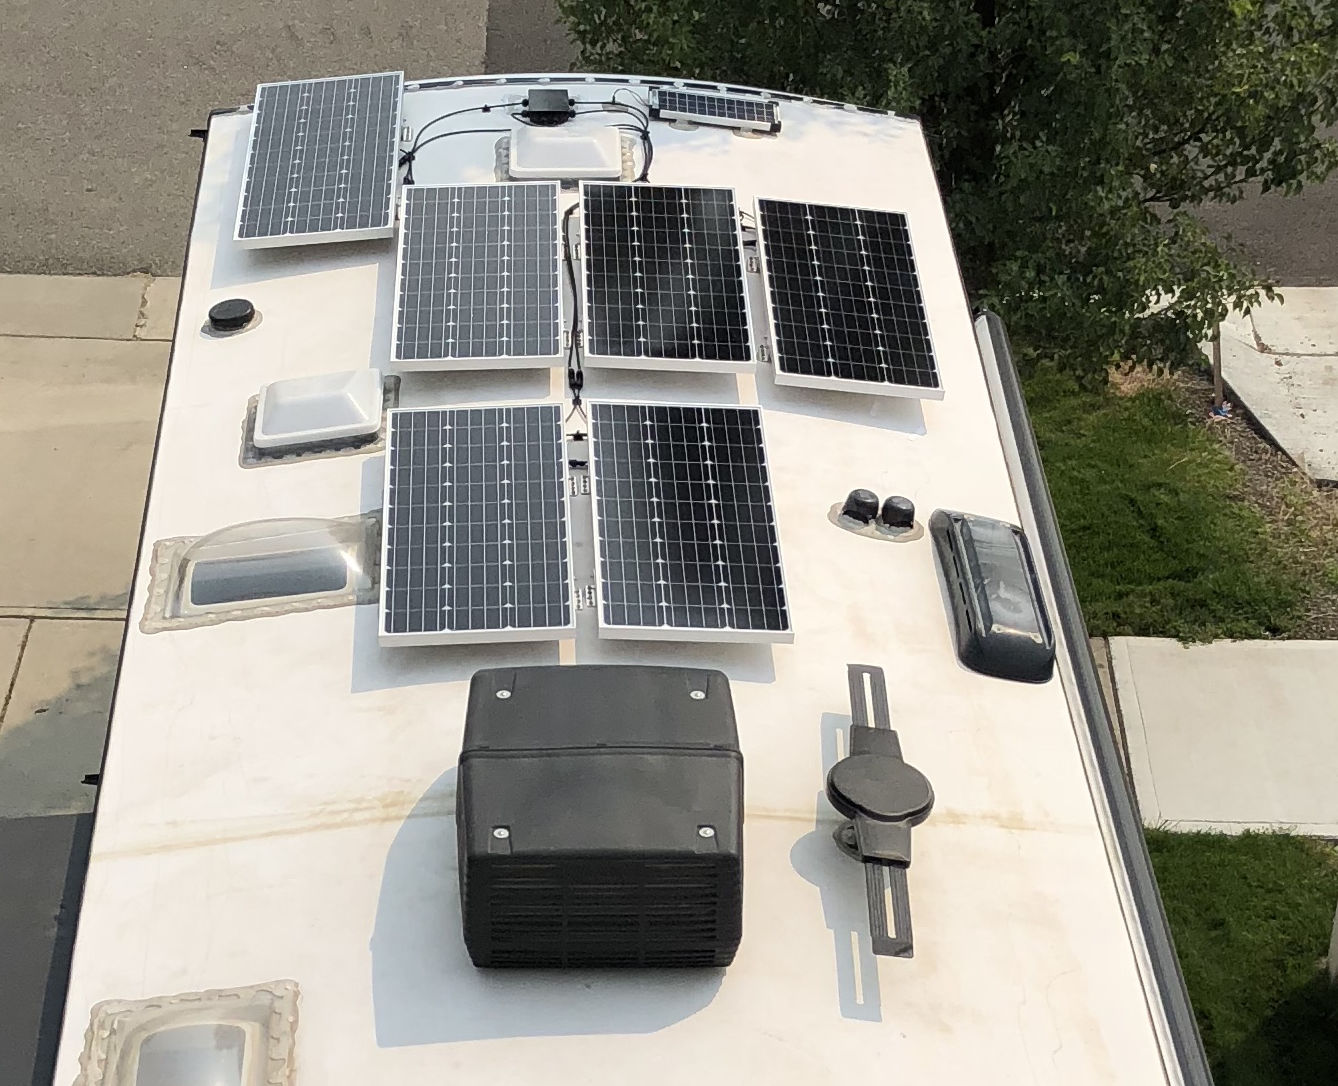
Z-brackets are the default. Four brackets per panel is the common convention (one near each corner); longer or heavier panels such as 200W units often use six. The exact count and placement depend on your panel's frame, the clamping zones in its installation manual, and expected wind loads, so check the panel manual rather than treating 4-or-6 as a universal rule. Bolt brackets to the panel frame and screw to the roof with stainless steel screws, ideally into a joist or truss, and seal every penetration. Z-brackets hold the panel about an inch off the roof, which allows cooling airflow underneath. They are cheap, simple, and repairable.
Tilt mounts replace fixed brackets with hinged legs that let you angle panels toward the sun. In winter at higher latitudes, tilting can add roughly 10 to 25 percent more daily energy versus flat mounting; in summer or near the equator, the gain shrinks to low single digits. Actual results depend on your latitude, season, and how consistently you adjust the angle. The trade-off is moving parts: check hinge bolts for tightness at least twice a year, and always fold panels flat and lock them per the mount manufacturer's instructions before driving.
Corner and side brackets (sometimes sold as ABS plastic mounts) glue or screw to the roof and cradle the panel edges. Plastic corner mounts are popular for a clean look, but inspect them yearly: UV degrades plastic faster than aluminum, and a cracked corner mount on a 65 mph highway is a bad day. Aluminum Z-brackets remain the durability benchmark.
Strut channel (Unistrut) is the heavy-duty option for large arrays. Two rails run fore-aft on the roof, panels bolt to the rails, and the rails spread the load across many attachment points. It adds weight and cost, but for 800W-plus arrays it is the most secure and serviceable mounting system you can build.
Mounting methods for flexible panels
Flexible panels weigh almost nothing (about 2 to 4 pounds per 100W) and conform to gentle roof curves, which opens up mounting options that would never work for glass panels.
Adhesive mounting is the primary no-drill method. Renogy's own flexible-panel manuals approve silicone adhesive on the panel back for permanent installation, plus fastening through the corner grommet holes. In the DIY community, 3M VHB tape and Sikaflex 252 polyurethane are also widely used with reported success at highway speeds, but these are community practices, not named manufacturer approvals. Check your specific panel's manual for its approved methods. Whichever adhesive you use, surface prep is everything: wash with isopropyl alcohol, let it flash dry, apply in the pattern the manufacturer specifies, and keep weight on the panel for the full cure time (usually 24 to 48 hours). Note: adhesive bonds to the roof membrane itself, so on EPDM/TPO the install is only as strong as the membrane's own bond to the roof deck.
Screws through grommets are the backup method. Many flexible panels have metal grommets around the edge. You can screw through them into the roof like a tarp, but this is generally reserved for non-mobile installations (sheds, cabins) by the manufacturers. On a moving RV, adhesive plus edge sealing lasts longer because screws through thin laminate can elongate their holes under vibration.
T-track or slide-in rails suit owners who want removable panels. Aluminum T-track glued or screwed to the roof accepts bolts that slide in the channel, so panels lift out for cleaning or replacement. It costs more than direct adhesive, but it solves the biggest downside of glued panels: removal. A glued-down flexible panel that fails is genuinely difficult to remove without damaging the roof membrane.
One honest trade-off: flexible panels glued flat run hotter than rigid panels on brackets, because there is no airflow underneath. Expect a few percent less output on hot days and a shorter service life than glass panels. If your roof is flat and you have the clearance, rigid panels on Z-brackets remain the longevity play.
Drill vs no-drill: making the call
This is the most debated topic in RV solar forums, and the answer depends on panel type, not philosophy.
Drill when: you are mounting rigid glass panels; you want the array to survive a decade of highways and storms; your roof is EPDM, TPO, or fiberglass that seals well. A properly sealed screw penetration in a rubber roof is a solved problem: the industry has done millions of them. The sealant does the waterproofing, not the screw.
Go no-drill when: you are mounting flexible panels using the adhesive method your panel manufacturer approves (Renogy specifies silicone adhesive); you have a brand-new roof under warranty and the dealer warned against penetrations; or the install is temporary. Modern structural adhesives are remarkably strong in shear, which is the main load on a flat roof.
What does not work: no-drill mounting for rigid panels using only VHB tape or suction-style mounts at highway speed. The uplift force on a 200W glass panel at 70 mph is real, and adhesive-only glass installs have a documented history of departing the roof. If the panel is glass and the RV moves, drill it.
Sealants that actually work
Sealant choice is where most DIY leaks originate. The products below are the ones RV techs actually use; everything else is a gamble.
Dicor self-leveling lap sealant is the default for EPDM and TPO rubber roofs. It flows into a smooth dome over screw heads and bracket feet, stays flexible for years, and is UV stable. Apply it generously over every penetration, then inspect yearly and recoat when you see cracking or shrinkage. Keep a tube on board; it is the duct tape of RV roofing.
Sikaflex 221 polyurethane sealant is the choice for fiberglass and aluminum roofs. Sikaflex 252 is a separate product: a structural adhesive for bonding flexible panels, not just a sealant. Do not use them interchangeably. Both bond to almost anything, stay flexible, and are paintable. Polyurethane is harder to tool neatly than Dicor and takes longer to cure, but the bond strength is in a different league. Check the exact product data sheet for your roof material before buying.
Eternabond tape is a micro-sealant tape with a legendary reputation for permanent repairs, compatible with EPDM, TPO, fiberglass, and aluminum per the manufacturer. Use it over existing seams, around cable entry glands, and as a belt-and-suspenders layer over bracket feet on rubber roofs. Surfaces must be clean and dry, and it will not bond to silicone-contaminated surfaces. Once it bonds, it does not come off cleanly, so position it carefully the first time.
What to avoid: plain silicone caulk (poor adhesion to EPDM, nearly impossible to remove fully for future repairs), petroleum-based roofing tar on rubber membranes (degrades EPDM), and construction adhesive not rated for UV and roof temperatures (it will crack within a season or two).
Routing cables into your RV
Getting the wires from the roof to the charge controller without creating a leak is a project of its own. Plan the route before you mount a single panel.
Roof glands (cable entry housings) are the cleanest method. You drill one hole, pass the solar cables through a purpose-built gland with rubber seals, then bed the gland flange in Dicor or Eternabond. Double-gland housings let you add a second wire pair later without drilling again. This is what professional installers use.
Refrigerator vent routing avoids new holes entirely on many rigs. The fridge roof vent already penetrates the roof, and there is usually room to drop solar cables alongside the vent stack into the RV. This is common practice but not officially approved by every RV maker: keep cables separated from the hot vent pipe (heat plus vibration causes chafing), protect them with split-loom conduit, and seal the top of the vent cap where the cables exit. If your manual prohibits it, use a dedicated roof gland instead.
Do not use plumbing vents. Drilling into drain or vent piping for cable routing is prohibited by RV electrical code (NFPA 1192). If no fridge vent is available, install a dedicated waterproof roof gland instead.
The drip loop is non-negotiable. Before any cable enters the roof, leave a U-shaped sag in the wire below the entry point. Water follows gravity along the cable jacket; the loop forces it to drip off instead of tracking into the hole. Every professional install has drip loops. Skipping them is the most common cause of mysterious leaks that appear months after installation.
Inside the RV, run cables through split-loom conduit to the charge controller location, keeping solar DC wiring separated from AC wiring. Fuse the positive wire near the battery per your controller manual, and use a disconnect switch or breaker so you can isolate the array for service.
Weight, wind, and highway speeds
A 600W rigid array weighs roughly 80 to 90 pounds including brackets and wiring. Do not assume your roof can carry it just because it holds a person during maintenance: a person is a brief, distributed load, while solar is a permanent load plus wind uplift, vibration, and thermal cycling for years. Check your RV manufacturer's roof load rating and mounting restrictions first. Many roofs handle a 600W array fine when weight is spread across many attachment points, but warranty terms, roof age, and prior damage all matter. When in doubt, get a professional assessment before drilling.
Distribute weight evenly fore-aft and side-to-side. Do not cluster all panels at the rear; it changes tongue weight on travel trailers and handling on motorhomes. Keep panels clear of the air conditioner shroud (vibration and shading) and away from the roof edge where wind gets underneath.
Wind uplift is the force that matters at speed. Panels are rated for 2,400 Pa wind load, which corresponds to roughly 140 mph equivalent pressure, far above highway speed. But that is the panel's laboratory rating, not your installation's rating: the brackets, screws, adhesive, roof membrane, and RV structure each have their own limits, and the system is only as strong as its weakest link. The failure mode in real incidents is almost always brackets pulling out or screws backing out under vibration, not the panel itself breaking. Stainless steel fasteners, thread-locking compound on bracket bolts, and yearly torque checks are cheap insurance.
Low branches and overpasses deserve a mention: panels add 3 to 4 inches of height on Z-brackets. Measure your total rig height after installation and write it on a card on the dashboard. Tilt mounts left raised add far more; fold them flat before driving, every time.
Common mounting mistakes to avoid
Over-tightening screws. Cranking Z-bracket screws until the rubber membrane dimples deeply creates a stress point that cracks sealant. Snug plus a quarter turn, then let the Dicor do the sealing. The screw holds the bracket; the sealant keeps water out.
Wrong sealant for the roof. Silicone on EPDM, petroleum tar on rubber, or interior caulk anywhere on the roof. Match the sealant to the membrane as described above.
No drip loop. Covered above, worth repeating: every cable entry needs one.
Shading one panel in a series string. If your panels are wired in series, shade on one panel (from the AC shroud, a vent, an antenna) drags down the whole string. Lay out panels to avoid partial shade, or wire in parallel (or series-parallel) so shade affects less of the array.
Ignoring wire gauge on long runs. Undersized wire wastes power as heat and can overheat. Critical distinction: the panel-to-controller run and the controller-to-battery run are different circuits. Panels wired in series run at high voltage and low current (for example, 60V at 10A), where 10 AWG over 20 feet is fine. But the controller-to-battery run at 12V carries the full charging current: 600W at 12V is 50A, and with the required 125% continuous-load sizing that is 62.5A, which exceeds what 8 AWG can safely carry. Keep the controller-to-battery run as short as possible (a few feet) with thick wire, and calculate voltage drop on the actual current, total round-trip wire length, and a 3% maximum drop target. When in doubt, go one gauge thicker and check your controller manual.
Mounting over damaged roof. Soft spots, delamination, or cracked membrane under a new panel will only get worse with the added weight and trapped moisture. Repair the roof first.
Forgetting service access. Leave room to reach the charge controller, disconnects, and cable glands. Burying connections under permanently glued panels turns a 10-minute fuse check into a roof demolition.
DIY or hire a pro?
A straightforward rigid-panel kit install (panels, brackets, gland, controller, fuse) is genuinely a weekend project for a handy owner. The skills needed are basic: drilling clean holes, applying sealant neatly, crimping MC4 connectors, and following a wiring diagram. Budget roughly $100 to $200 for sealant, cable glands, stainless hardware, and wiring extras on top of the kit price. That is an estimate: roof repairs, custom mounting, battery upgrades, or inverter integration add significantly more.
Hire a professional when: the roof needs structural assessment or repair first; you are installing more than about 800W with complex wiring; the system ties an inverter into the RV's AC panel or transfer switch; you are not comfortable working at height; or your RV is under a roof warranty that requires certified installation. A pro install of panels plus controller typically runs $1,500 to $3,000 in labor; full systems with inverter and batteries start higher.
Either way, the safety rules are the same: disconnect the battery before wiring the controller, never work on the roof wet or in high wind, wear fall protection on tall rigs, and keep sealant fumes ventilated. Critical: illuminated solar panels are always electrically live, even with the controller or battery disconnected. Disconnecting the controller does NOT de-energize the panels. Solar DC can arc and burn; treat every PV wire as live in daylight. Cover panels with an opaque blanket while making final connections.
Frequently asked questions
Can you mount solar panels on a rubber RV roof?
Yes. Rubber roofs (EPDM and TPO) are the most common RV roof type and they accept standard Z-bracket mounting with screws into the roof structure. The key is sealing every penetration with a compatible self-leveling sealant such as Dicor, and checking the sealant yearly. Avoid petroleum-based products on EPDM rubber because they can degrade the membrane.
How many screws do I need per solar panel?
A standard 100W rigid panel uses four Z-brackets, one near each corner, with one or two screws per bracket into the roof deck or a joist. That is 4 to 8 screws total per panel. Larger 200W panels often use six brackets. Every screw hole must be sealed; the brackets themselves do not waterproof anything.
Do flexible solar panels need an air gap underneath?
Flexible panels run hotter when glued flat to the roof because there is no airflow underneath, and heat reduces output. Most manufacturers approve direct adhesive mounting anyway and rate their panels for it. If your roof allows it, a thin air gap (even 0.5 inch on standoffs) keeps panels cooler and extends their life.
What is the best sealant for RV solar panel mounts?
Dicor self-leveling lap sealant is the standard for EPDM and TPO rubber roofs. Sikaflex 221 or 252 polyurethane works well on fiberglass and aluminum and doubles as a structural adhesive. Eternabond tape is excellent for sealing over existing seams and around cable entry glands. Never use plain silicone on a rubber roof; it does not bond well and makes future repairs difficult.
Can I mount solar panels on my RV without drilling holes?
Yes, for flexible panels. Renogy approves silicone adhesive and grommet-hole fastening in its flexible-panel manuals; 3M VHB tape and Sikaflex 252 are also widely used in the RV community with reported highway success, though not named as official approvals. For rigid glass panels, no-drill mounting is risky: the panels are heavy and catch wind at highway speed, so mechanical fasteners into the roof structure are strongly recommended.
How do I find roof joists or trusses in my RV?
A stud finder rated for the roof thickness can locate joists through the membrane. Some owners tap the roof and listen for the solid sound over framing versus the hollow sound between joists. As a fallback, many RV roofs use 3/8-inch plywood decking that holds screws adequately even between joists when combined with sealant, but hitting framing is always stronger.
What tilt angle is best for RV solar panels?
As a rule of thumb, tilt your panels to roughly your latitude for year-round average output, steeper in winter (latitude plus 15 degrees) and flatter in summer (latitude minus 15 degrees). Flat-mounted panels lose roughly 10 to 15 percent compared to optimally tilted panels, though the real gap depends on latitude and season. Always fold tilt mounts flat and lock them before driving.
How do I run solar cables from the roof into the RV?
The cleanest method is a waterproof cable entry gland (also called a roof gland or cable clam) sealed with Dicor or Eternabond. Drill one hole, pass the cables through, seal generously. Alternatives include routing down the refrigerator vent or an existing plumbing vent. Always leave a drip loop: a low sag in the cable outside the entry point so water runs off instead of following the cable inside.
Will solar panels survive highway speeds and storms?
Properly mounted rigid panels routinely survive highway speeds and severe storms. Most panels are rated for 2,400 Pa wind load (about 140 mph equivalent) and 5,400 Pa snow load, but that is the panel’s lab rating, not your installation’s: brackets, screws, and roof structure each have their own limits. The weak link is almost never the panel; it is the mounting hardware or sealant. Use stainless steel fasteners, check torque yearly, and re-inspect sealant after hail or high-wind events.
Should I hire a professional to install RV solar panels?
If you are comfortable drilling into your roof, sealing penetrations, and wiring a charge controller with proper fusing, a DIY install of a panel kit is very doable. Hire a professional if your roof needs structural assessment, you are adding more than about 800W, you need an inverter tied into the RV's AC system, or you are not confident working on a roof. A pro install of panels plus controller typically runs $1,500 to $3,000 in labor; full systems with inverter and batteries start higher.